.

Tuesday, April 19, 2011

DIY Clear Glass Lamp

Sooo...Pregnancy took the domesticity out of me real quick. Actually that's not true, it took the "crafting" part out of me. I was all about cleaning, cleaning, and more cleaning. I was super O.C.D. about it- I would re-clean something that I had just deep cleaned the day before. I had this feeling throughout most of my pregnancy that I had to be prepared in case he came early... and of course he was a week late. Well now that he is here, and we have settled into each other a bit- I'M BACK- and it feels great. I have a million projects started around the house, and not too many are finished. Here is one that is:

I have seen clear glass lamps all over the place and LOVE LOVE LOVE them, but I don't love the hefty price tag that comes along with them. Why in the world are lamps so expensive anyways?!?!??! I don't get it.

Let me back up a minute... During my middle of the night feedings I usually google ideas that pop in my head, and end up browsing through blogs of course (on my phone- one handed). It keeps me awake so I don't fall asleep and drop Liam. Well I have no idea how I came across it (blame the drowsiness for my lack of memory) but I found this blog called Triangle Honeymoon and their post about a DIY clear glass lamp inspired by Crate & Barrel's Zak lamp that costs $229!
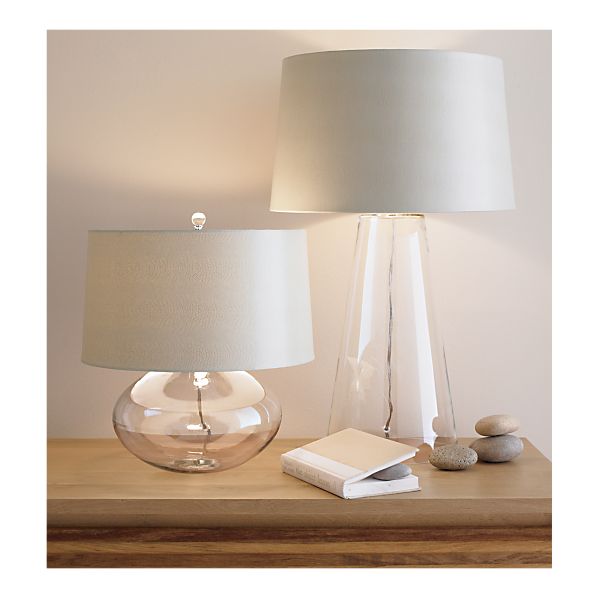
 Crate & Barrel

They made one themselves....so why couldn't I?

Here are the supplies I used:


I turned the vase upside down and started drilling a hole in the middle of the bottom of the vase (soon to be the TOP of my lamp base). Ryan saw me doing this and decided it looked fun and wanted to take over... be my guest! So actually RYAN drilled the hole with lots of input (aka nagging) from me. Keep the area wet- thats what google said... dont go to fast it will crack... slow down.... don't put too much pressure on it. I'm sure I was a little bit annoying. =)   It came out perfect and it was a good inch thick of glass on top.
Once the top hole was drilled, he drilled one on the side, closer to the opening of the vase. This is where the cord would come.

 I stuck the wire through the side hole, then slid on the white rubber end cap, then stuck the end through the hole on the bottom of the vase (top of the lamp).

Once the wire is through the top hole, attach the rest of the lamp kit in the order that the instructions (that come with the kit) say. I would go over them, but its pretty self explanatory.

 This is where I added some Gorilla Glue. I put a bit of glue on the screw and on the bottom of the metal piece (technical term), to make sure it didn't twist around.
And here is the finished lamp, sitting in my living room....

I have been working on a gallery wall behind my couch, s o excuse the empty (or store photos) frames I finally got all of the frames up, but haven't finished putting art inside them yet. More on that later.
Since there is so much going on on the wall I really wanted an understated lamp that wouldn't be "too much" in front of all those frames. This is perfect!


Wednesday, March 9, 2011

Back to my Bump

Since I took a little break during most of my pregnancy I thought I'd share with you a bit about my life in the last few months or so. I would work on something and I think "I should blog about this!" but I never did; so I have some little projects to feature soon. The big one was Liam's room. It was a labor of love. I had my freak out moments where I thought, "This baby is not going to have a room when he gets home!" But in the end it all came together and I love it. I'll keep you waiting for that one though.
My pregnancy was fairly easy. I only got nauseous twice, and threw up both of those times. One was because I took a prenatal on an empty stomach. Ryan and I were in the car (driving to check out a craigslist side table- that ended up being a piece of plastic crap) and I wasn't feeling very good but I was about 5 months pregnant so I didn't think I would throw up since I never had any morning sickness before this point. To make a nasty, long story short... driving down a major street I decided OHHH YES, I'm gonna puke... and I couldn't get the window down in time. That's all I'll say about that...Not a pretty picture! The other time I was at home, and made it to the toilet so that was not so bad.  So overall I was thankful that I didn't have to deal with being sick during my pregnancy! I thought "Why do people always complain about being pregnant, this is a piece of cake."
Toward the end (7, maybe 7 1/2 months) I began to realize why people complain about being pregnant! Constantly being uncomfortable, and terrible sleep, aching back, tired all the time! Poor Ryan had to listen to my ongoing complaints. In the end it was so worth it though.
I was 9 months pregnant and hadn't taken any maternity photos. I started to get really bummed about that, and wanted to capture this time in our lives. It was too late to book a photographer and I really didn't want to pay for that anyways. So I enlisted my little sister who took photography for 4 years in high school (that doesn't make her a pro, but at least a better option than just anybody). We had a lot of fun taking them. I made outfit changes in a field while trying to hide from some farmer when it was 50 degrees. It was a memorable day. I already love looking at them and thinking back to Liam getting ready to come into the world. Its crazy to think how much more love is in my life now than just over a month ago.


This graffiti one is just too fun not to include...

If you go over to Spearmint Baby (a great blog!) you can see where my baby bump was featured over there too.

Monday, March 7, 2011

Upcoming Product Review

CSN stores has offered me $40 credit towards a product review for one of their 200 online stores. I love CSN, not just because they are awesome with their give-a-ways, but because they have pretty much everything on their site. One day soon when Liam is old enough I can check out some of their swing sets. Until then I look around for some goodies like these...

An orange hamper for Liams room, or maybe for his closet. Especially since I'm currently using an empty cardboard diaper box for his dirty close.

My oven would look good with this Lovebirds kitchen tea towel hanging on the handle


I'm really leaning towards some new white sheets for our bed...

Thursday, March 3, 2011

Baby News!!!


Liam is here... well he's been here for over a month now. I'm sorry to my poor blog for neglecting you for so long. I have had a very important project I've been working on- a new baby. =)
I am enjoying motherhood so much. Wow, what a great experience. I never knew how much you could love a little child until now. I use to hear that all the time, but boy is it true. I am amazed every time I look at him. God has truly blessed me with a wonderful family. I am so thankful.
The labor was good and everything went smooth. I can tell you more details later. Its currently 11 pm and I'm waiting to feed him in about 5 minutes. I have been following the book "Babywise" and so far things have been going good. There's been some rough nights/naps along the way.
I just wanted to quickly say Hello and sorry for being MIA for so long. I miss my blog so much. I have a different computer then I use to, and it is TERRIBLE for blogging which is a large part of why I quit. So I need to get use to this new (old) computer and I should be back soon. Here are a few pictures of my precious new baby.


First time home...
In the Hospital- 1 day old...


The following pictures were taken at 11 days old.
Mommy & Baby...

Family Love...
My favorite picture ever...
In his nursery, where we spend a lot of time feeding/eating...
My boys...
Family Time...
And this is Liam TODAY- at 5 1/2 weeks old and 11 lbs 2oz.

Saturday, October 2, 2010

Nursery Bedding

I found the bedding I wanted for Liams nursery, but there was a bit of a problem... it was $330! Sooo not in my budget. But I was really stuck on that design, nothing else seemed to float my boat if you will. It is called Chocolate Dots from Dwell Studio. I was determined to find it cheaper, so I started browsing craigslist in Los Angeles and Orange County since they are not too far from us, and Ryans brother lives in O.C. I searched for months... nada. Then a light bulb went off! I googled "Dwell Chocolate dots crib bedding craigslist". I found a lot of expired listings, a few were STILL too expensive, then BAM... the mother load! In Burmingham, Alabama the entire 4 piece set was listed for $50!!! I prayed and prayed then emailed her to ask if she would be willing to ship it to California, for a fee of course. She was sooo nice and responded right away. YES she said. She would ship it for $25, totally worth it, since she had to take time out of her day and everything. I was a little nervous but I paid through paypal which is pretty safe. Right after I contacted her, I paid, she shipped, I received it 4 days later. It is in great condition too. I still can't believe I got $330 bedding for only $75.  Go craigslist!

We painted the walls a very light blue, much lighter than the walls above. I'll take pictures soon of the progress. I'm going to go with a light blue, brown, orange, and white color scheme. With hints of airplanes here and there, but not "themey".  I can't wait to show you more. 3 1/2 more months til Liam gets here! I can't wait.

Friday, October 1, 2010

Free Nursing Cover

Thank you to those who helped me pick-out a diaper bag.  I ended up going with the Biplane white diaper bag.  I know white gets dirty fast but I read the description and it says something about a wipe-clean surface. Here's hoping. Besides, I'm assuming with a baby... everything is going to get dirty anyways.

If your not sick of baby gear yet... I found a great deal on a nursing cover-up. You can go get a a FREE "Udder Cover" from UdderCovers.com. I was browsing my local craigslist.com and read someone's post about a $32. discount (the price of an "udder cover") when you put in the promo code "cranberry2" OR "onefree". Either one works. You will still have to pay their normal $9.95 shipping fee. I have no idea how long this lasts, but it is currently working.  Side note: I am not getting paid for this at all! =)
I'm hoping my little cover will come in handy when I have to breast feed and there might be a few people around who I don't feel like flashing. I ordered the Porter one because it seemed the most nonchalant, although the Elsa is super cute too. If your not expecting these would be a cute (and CHEAP!) gift for the next baby shower your invited to. I received mine in just a few days and did not have any extra charges on my card, so its not a scam. Good news to you guys.
PORTER

ELSA

Thursday, September 30, 2010

Cook This Not That ...Cheesecake

Back in March, my friends Matt & Sam got me one of my favorite cookbooks. It is from the Eat This Not That line of books. One of my favorite recipes from it, is their Ricotta Blueberry Cheesecake. It is oohhhh so good, and you dont feel so guilty about eating cheesecake. Who doesn't love that!?!? Each serving has 360 calories. Not diet food, but better than compared 700.


Tuesday, September 28, 2010

Its Gettin Spooky Around Here...

I started my Halloween decorating....
I started with my mantle. I used some black and white wrapping paper that I already had. I cut it in a thin strip so if my candles spill down, it won't stick to the mantle. I used some jars and vases and put some creepy stuff from Michaels in them.


For the witch and bat silhoutes, I found some images online. I traced them and used an exacto knife to cut them out.


For the front door, I stuck up my fall wreath that I purchased at TJ Maxx a couple years ago. Then I found the black sparkley skeleton at the $1 store! He can hang out til Halloween is over.
*Update* After I posted this, one of my favorite bloggers Vanessa decided to make use of the $1 store skeleton for her  home-made wreath.... Go check it out because hers is way  cuter than mine.


Then when you walk in...

I found these (above & below) orange jar candles at Rite Aid on sale for $3! They smell like spiced pumpkin... Mmmm. I cut out some bats on black card stock then attached them with twine. I love how the frosted glass glows.
I added a few touches of fall here and there. Some fall leaves in an apothacary jar sit in the living room next to the couch.
On the table in the breakfast nook, there are some fall fruits all glitzed up.
Dont look too close.. or you'll notice the beadboard was NEVER finished from forever ago. I started it, and really dont have the motivation to finish it...YET.

This morning I baked banna-nut muffins and then it really felt like fall in my house. Now, I'm just waiting for the weather to catch on to that. ;)
Related Posts Plugin for WordPress, Blogger...